Posted by Spycor Building on Nov 18th 2025
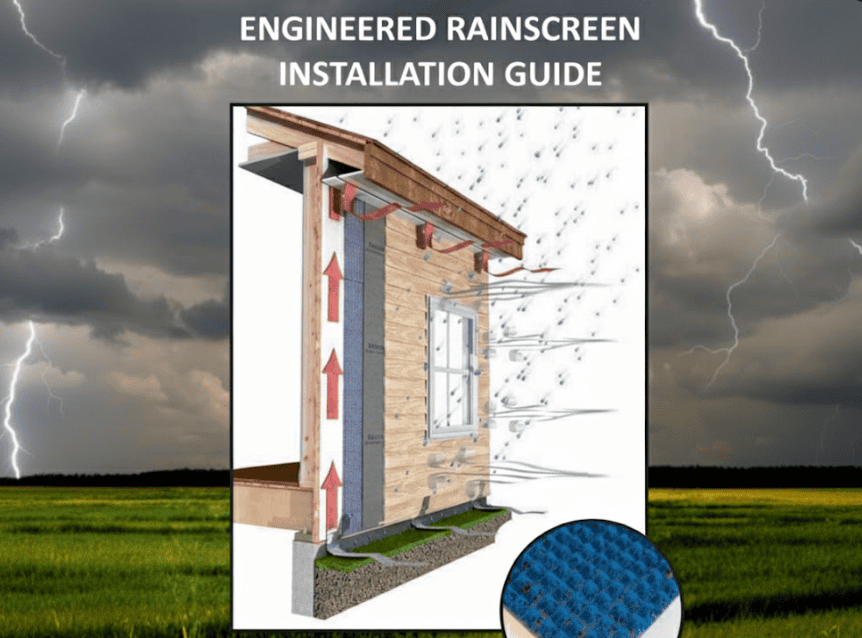
Achieving a durable, healthy, and high-performing wall system depends on proper moisture management. The Mortairvent Rainscreen is an essential component, functioning as both a rainscreen drainage mat and a rainscreen ventilation mat, ensuring that incidental moisture can escape and the wall assembly can dry efficiently. This comprehensive guide walks you through the best-practice installation process to maximize the effectiveness of your mortairvent system.
Key Components and Preparation for
Installation
Before starting, ensure you have all the necessary materials and have completed the critical initial steps. Proper preparation is key to a successful and compliant installation.
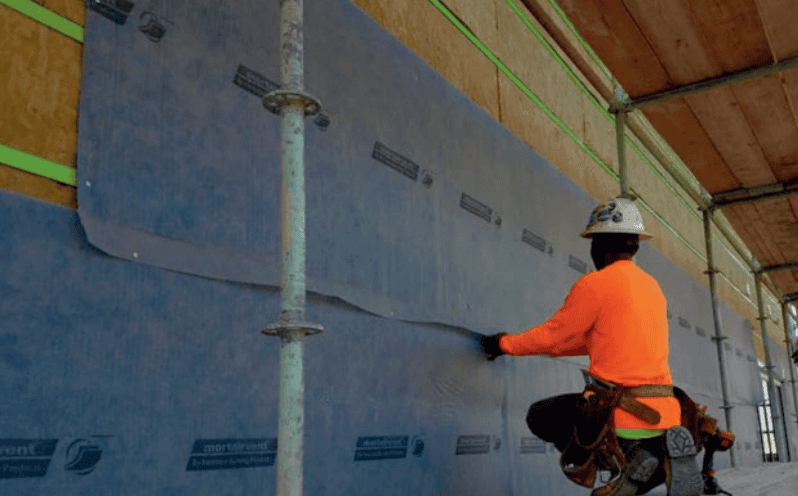
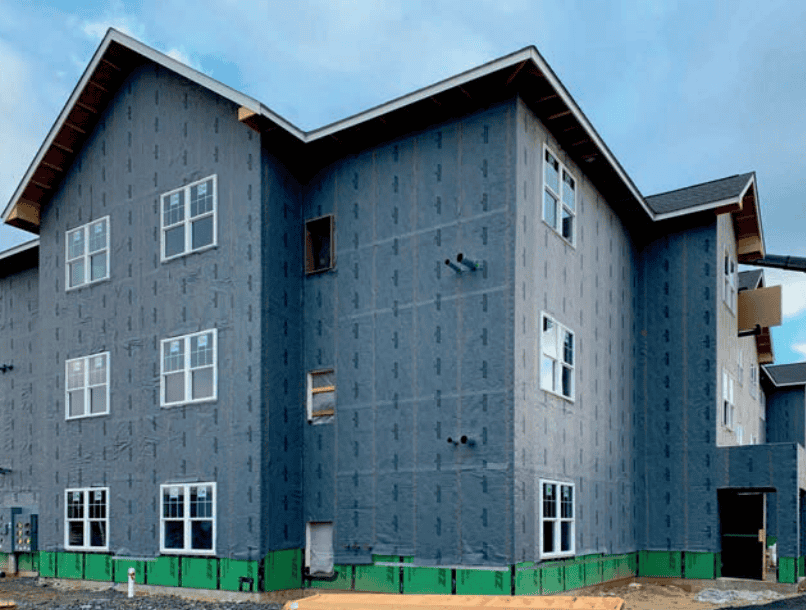
Weather Resistant Barrier (WRB) Application
The Mortairvent Rainscreen is installed over a Weather Resistant Barrier (WRB), which acts as the primary defense against water intrusion.
- Apply the WRB over the sidewall sheathing according to the manufacturer's instructions.
- Crucially, check local building codes: Some regions may mandate two layers of a WRB for enhanced protection. Always comply with local code requirements.
Window and Door Integration
-
Ensure windows and doors are fully installed and properly flashed before beginning the MortairVent installation. This establishes a continuous barrier against bulk water penetration around openings.
Required Tools
- Staple gun or hammer (for nails)
- Cap nails or wide-crown staples (recommended for secure attachment)
- Utility knife
- Tape measure
Detailed MortairVent Rainscreen
Installation Steps
Follow these sequential steps precisely for a continuous rainscreen drainage mat and rainscreen ventilation mat layer.
1. Starting the First (Bottom) Course
The base of the wall requires a specific setup to create an effective insect screen and drainage plane.
- Start at the base of the wall and unroll the mortairvent rainscreen from right to left.
- The material orientation is critical:
-
The three-dimensional (blue) polymer matrix must be placed against the WRB.
-
The fabric facing should be toward the exterior of the building.
-
The integral fabric flap should be positioned at the bottom of the roll.
-
- Secure the material: Staple or nail the mortairvent approximately every three square feet. Using cap nails is highly recommended as they provide excellent holding power without puncturing the WRB excessively.
- Create the Insect Screen: On this first (bottom) course only, unfold the fabric flap and tuck it between the blue polymer matrix and the WRB. This flap creates a vital screen to prevent insects from entering the drainage cavity while still allowing moisture to drain and air to circulate.
2. Installing Intermediate Courses (Moving Up the Wall)
As you move up the wall, the focus shifts to creating a shingle-lap to ensure continuous water shedding.
- When starting the next course, butt the blue polymer material tightly together with the course below it. Do not overlap the blue matrix material. Overlapping the matrix will compress the drainage channels and impede airflow and drainage.
- Take the fabric flap from the new, upper course and pull it down over the fabric facing of the previous course (shingle style).
- Staple the overlap to secure it. This overlapping fabric layer helps shed any moisture that might penetrate the siding or the outer fabric layer.
3. Handling Horizontal Channels and Cuts
The Mortairvent Rainscreen is designed to perform even with necessary cuts and adjustments.
-
If the drainage channels are installed horizontally due to cutting and patching around obstacles, mortairvent will still perform as intended. The unique three-dimensional structure ensures drainage and ventilation in all directions, making field adjustments straightforward.
4. Adjusting the Bottom Edge
-
The bottom edge of the mortairvent roll (the non-flap side) can be trimmed to adjust for height and ensure it aligns perfectly with the foundation or the desired starting point for your siding.
5. Installing the Top Course
The top of the wall requires a specific inverted installation to create another effective insect screen and to terminate the drainage plane cleanly.
- For the top course, invert the roll (flip it over).
- Unroll the material from left to right. This orientation places the fabric flap at the top.
- Create the Top Insect Screen: Unfold the fabric flap and tuck it between the blue polymer matrix and the WRB. This top flap acts as the upper insect screen, ensuring that the necessary ventilation gap is protected from insect entry while still allowing moist air to escape.
6. Applying the Siding
With the Mortairvent Rainscreen successfully installed, the wall assembly is now ready for the final cladding.
- Apply your chosen siding material directly over the mortairvent.
- Critical: Use the siding manufacturer’s recommended fasteners and spacing. The fasteners will pass through the siding, mortairvent, WRB, and into the sheathing or wall studs. The three-dimensional matrix of the MortairVent is resilient and maintains the drainage and ventilation cavity even under the pressure of the siding.

The Power of MortairVent: Drainage and
Ventilation
Mortairvent is a crucial element in modern construction, targeting high-ranking needs like rainscreen drainage mat and rainscreen ventilation mat solutions.
The three-dimensional polymer matrix creates a continuous 6mm (or $1/4$ inch) cavity behind the cladding. This gap serves two vital functions:
- Drainage Plane: Any bulk water that bypasses the siding runs down the back of the cladding and is held away from the WRB, allowing it to drain harmlessly out the bottom. This is the essence of a reliable rainscreen drainage mat.
- Ventilation Plane: The continuous gap allows for convective drying. Air enters at the base, circulates behind the siding, and exits at the top. This airflow actively dries the back of the cladding and the face of the WRB, mitigating the risks of mold, mildew, and premature material degradation—the core function of a superior rainscreen ventilation mat.
Investing in a proper rainscreen assembly with mortairvent is an investment in the longevity and health of your entire building structure.
Ready to enhance your wall system's durability and health? Ensure your next project uses the best in moisture management technology.
Order Now and discover the full range of rainscreen and building envelope solutions at spycorbuilding.com.
Frequently Asked Questions (FAQ)
What is MortairVent Rainscreen?
Mortairvent is a three-dimensional polymer mesh product that creates a continuous 6mm (1/4 inch) air space between a wall’s cladding and its Weather Resistant Barrier (WRB), functioning as a combined rainscreen drainage mat and rainscreen ventilation mat.
Why is a WRB needed with MortairVent?
The Weather Resistant Barrier (WRB) is required as the primary barrier against bulk water. MortairVent is installed over the WRB to manage incidental moisture and facilitate drainage and ventilation of the wall assembly.
Can MortairVent be installed horizontally?
Yes. While typically installed vertically, if channels are installed horizontally due to necessary cutting and patching, the MortairVent Rainscreen will still perform as intended, providing effective drainage and ventilation.
What kind of fasteners should I use to install MortairVent?
Cap nails or wide-crown staples are recommended. The material should be secured approximately every three square feet
Do the blue polymer matrices overlap on intermediate courses?
No, the blue polymer matrix should be butted tightly together without overlapping. Only the fabric flap overlaps in a shingle-style manner to shed water.
What are the key benefits of using MortairVent?
Mortairvent Rainscreen provides superior moisture management by allowing bulk water to drain and promoting rapid drying via ventilation, preventing the deterioration of sheathing and reducing the potential for mold and mildew.